Showing posts with label DIY. Show all posts

Friday, June 6, 2014

50 (Thousand) Shades of Gray!

So I've FINALLY picked the main living area paint color. In the true spirit of DIY, I couldn't find what I wanted... So I made it myself!

I know I said back in this post that I had chosen Behr's Aqua Breeze, but the more and more I looked at it, the more I decided it wasn't what I wanted. Thinking about the accent colors I wanted in the room, and the fact that I really wanted the bold kitchen color to stand out, I decided I wanted something more neutral.
Right - Behr's "Aqua Breeze"
So I started pouring over dozens and dozens of paint swatches and bought nearly 2 dozen sample pots!!!

I wasn't kidding!

To be honest, I think at this point I'd lost track of which colors are which. I just knew none of the would work. The closest one that I like was Behr's "Pensive Sky" (2nd to the last on the bottom row), but it was a bit darker than what I wanted. So I tried the next one up, "Snow Leopard", which is the top left, but it came out weirdly blueish purple, and way too light.

Bottom Left "Snow Leopard", Right "Pensive Sky"
So I threw up my hands, and said "I give up!" and just decided to go with Pensive Sky, even though it was too dark. But I didn't love it. I can't bring myself to spend $150 on a 5 gallon bucket of paint that I don't love. And I wasn't spending another penny on samples! So what's a girl to do?

Get Mixin'!

I decided to try and mix up a custom color. I picked the two darker grays I liked the best.

Left, Glidden "Smooth Stone", middle Behr's  "Pensive Sky"
Smooth Stone was just a bit too brown, and Pensive Sky was a true gray, but in certain lighting looked a little blue. I mixed equal parts of those two. Then, I mixed two more samples, one with 1 part Behr's "Full Moon" (a very very light, almost white, gray) to 2 parts Smooth Stone and Pensive Sky, and one with equal parts of all three paints.

Here's what I got:


I didn't paint them in order(because that would have made too much sense!), but the middle one is the equal parts of the darker colors, the right is the one with 1 part of the light color, and the left is with equal parts of all three colors. I ended up liking the left color, the lightest one, the best! It's exactly what I had in my mind, but couldn't find in store.

Top color

Perfect light gray!
It's a touch lighter than what is coming across in the photos. I call it "Smooth Pensive Moon". I don't think Behr will be hiring me as a paint namer any time soon.

Next step, I am going to take in my custom mix, and have them paint match it, first to a sample to make sure it comes out how I want, then next stop 5 gallons and no more polka dot paint sample walls!


Wednesday, February 12, 2014

How to Make a Home Decor Mood Board

I just recently discovered a website that allows you to make mood boards, easily and for free! I am addicted to this now! You may share my difficulty with picturing all the elements of a room together. I know the general direction I want to move in, but it's hard for me to envision the entire project.

This site, Olioboard, is awesome for that. You can use their stock images, upload your own, and even search for specific brand items! Even if it's not the exact piece you have in mind, it still gives you a pretty good idea of what the finished room will look like.

 Here are the two boards I've recently made:

Living Room Mood Board


Master Bedroom Mood Board

So what do you think? The site is extremely easy to use, and for people like me who don't have photoshop or mad photoshop skills, it's a great resource.


P.S. No sooner had I posted my entry yesterday, and our Realtor called and said our roof was up! So of course I had to run out and see!


Wednesday, January 8, 2014

More DIY Envelope Pillow Covers

I finally finished up my new sofa pillows!


 I had bought this fabric quite a few weeks ago at Hobby Lobby(With my 40% off coupon) and got a pretty good deal on the pillow forms, also at Hobby Lobby on sale. I used my same technique I did with my  yellow and gray pillow that I made for my bedroom.(Click on the link for the full tutorial).

Sorry about the glare on these... this sits right in front of the only window in our condo! Hard to photograph.


These pillows were more difficult, only because of my stupidity. First my machine messed one up, and then after I ripped all the stitches out and started over, I had put the bottom piece on inside out!!! So third time was the charm, and the second pillow was super simple. Now I just need to find another fabric to make pillows for the couch.


I was going to buy another gold snakeskin pillow (Threshold by Target), but I think it would look too crowded with another pillow. Plus I'm liking the asymmetrical look, even though it bothers my OCD just a bit.

I love the gold and teal together!


Even Gambit gave me his seal of approval!

He just jumped up and posed for me!

PS: I also made another matching pillow for my bed. I just thought it looked more "finished" with two.

Sorry about the coloring, It's nighttime!

Monday, January 6, 2014

DIY Scrabble Magnets

I love words. I enjoy reading, writing, and words games, especially scrabble! I've seen some similar ideas floating around the interwebs, and so I thought I'd give this a try.


It started with me finding this down on it's luck scrabble set:


It's very old, and looks water damaged. I snatched it up, and since it didn't have a price, went to the checkout line to ask. The clerk responded with, "You want to buy that?!". After I assured him that yes, I did really want to buy it, he said, "I don't know, $0.10?" Awesome! I paid for it right then!

This guy's seen better days...

The box and playing board were both really damaged and falling apart, and I couldn't really use them for anything. So I removed all the wood tiles and gave them a good cleaning with my homemade cleaner.  Then I fired up my hot glue gun, and got to work.


I had these magnets left over from a previous pinterest craft attempt. I can't find the link now, but it involved gluing the magnets to small plastic baskets, to be used for spices on the side of the refrigerator. It was a huge fail. No matter how many magnets I glued on, the smallest item would cause the baskets to slide all the way down to the floor. Oh well!


I hot glued one magnet on the back of each tile, and then pressed them together for a few seconds so the glue would set.


Some of the tiles also had staining, but I like the look!

I let them dry for about a half hour (Hot glue dries super fast, and the tiles are light) then I arranged them all onto my fridge!


What do you think? I love that it's unique, and also since it's scrabble tiles you have the ability to make more words than with a traditional alphabet magnet set, because there are more duplicates. I actually ran out of magnets before I glued all the tiles, so I'll have to pick up some more to finish it out. I'm thinking there was about 100 tiles total, and I only had 50 magnets.

Fun Fun!

Thursday, November 7, 2013

Crockpot Cheesy Chicken and Rice

Hi all! Today I'm going to share with you an easy and inexpensive crockpot meal!


I love my crockpot. Nothing is better than throwing some ingredients into the slowcooker, and then arriving home from work to a great smelling house and a done or almost done dinner!

I don't even remember exactly where I got this recipe from. A friend of my mom's, I think. It is SO easy and delicious. I will warn you, this does contain "cream of" soups, which admittedly are not the healthiest things to eat, BUT sometimes you just need something easy and quick.

*** EDIT: My sister just updated me that this recipe came from HER friend, Sarah! All I could remember was my mom handing me a tupperware bowl and telling me to try it, and I was hooked as soon as I heard how easy it was! I've made it dozens of times since then, and it's always good.


First you are going to mix one family size cream of chicken soup and two regular sized cheddar soups.


Just dump them in and give it a good stir. I usually add a fair amount of black pepper, but maybe only a pinch of seasoned salt, if any at all. The soups have enough sodium as it is.

Next I added two large chicken breasts, about 3/4-1 pound. These were huge, usually I would use 3.

Just poke them down until they are covered by the soup, and that's it for now! They need about 3-4 on high or 4-6 on low. But it's basically impossible to over cook this. It's not uncommon for it to cook more than 10 hours from start to when we are sitting down to eat.


Once the chicken is done, I just take my spoon or two forks and start shredding the meat. The longer it's cooked, the easier this will be. After 6 hours it just falls apart.


 Next I steam a bag of frozen veggies and mix that in. I like broccoli, but carrots and/or peas are really good too!


The last thing is to cook your rice, which takes about 10 minutes typically. Then get yourself a bowl, load up with rice, and spoon the cheesy goodness on top!

Yum!


If I'm feeling extra indulgent sometimes I'll add some shredded cheddar to the top, but it still has great cheese flavor either way. Enjoy!


Ingredients:                                                                                                Printable Recipe
2-3 boneless, skinless chicken breast
1 family sized can cream of chicken soup
2 regular cans cheddar cheese soup
12 oz frozen vegetable of choice
4-6 cups brown rice
Black pepper, to taste
Mix together soups, add with chicken to crockpot and cover, cook for 3-4 hours on high or 4-6 hours on low. When chicken is finished cooking, shred the meat, then add the steamed vegetables. Cover and let sit while rice cooks. Serve over brown rice.
Serves 6+

Friday, November 1, 2013

DIY Halloween Costume

This year is the first year in a long time that I've actually dressed up for halloween. We are allowed to wear costumes at my work for halloween, but last year I just wore a lame themed t-shirt, and the year before that I put on a cat ear headband and called it a day.

Well not this year! I actually put together a real costume, and I didn't pay one cent! I am a HUGE fan of The Big Bang Theory, and since my hair is dark right now, I though I'd dress up as one of my favorite characters from the show, Amy Farrah Fowler.


From CBS.com


From Wikipedia

Thursday, October 24, 2013

How to make curtains from a duvet cover

WOW! It's been a while since I've posted! Sorry about that folks, I've been busy! However, I've finally finished my bedroom curtains, so that's what I'm going to share with you today.

Since I had decided on my bedroom color, wayyyy before I even actually painted my walls, I started hunting for curtains. Originally I was going to sew them myself(there are a TON of great tutorials out there for curtains), but  all the fabric I liked was super expensive, and I still didn't LOVE any of them. I knew I wanted something with gray and yellow in it, but not too much gray, because the walls and rugs are already gray. I'd been thinking I wanted to tie in another accent color, like aqua, and then I saw this on target.com:


I knew I was set on having an all white comforter for the bed, but I LOVED the colors and patterns in this. I've seen people on pinterest using sheets for curtains(but then I'd still have to put a liner in), and a quick google search found that a duvet cover would work as well!

I sat on the idea for a few days, until I checked back and saw that it was on clearance for $23. SOLD!

Thursday, October 3, 2013

Coral Dresser/TV Stand

I've finally got my TV console finished! I'm still waiting for the paint to fully cure(I used latex which can take 30 days to completely harden), which is why there is no TV on the TV console.

Sorry about the shadows... I need to invest in a "real" camera!

Tuesday, September 24, 2013

Glidden Granite Gray Bedroom Walls!

Well, I finally got my bedroom painted this weekend. Yay! You may remember what it looked like before:


Thursday, September 12, 2013

DIY custom phone case

I'm battling an illness right now, which is why I haven't posted in a few days. Today is just a short post with an idea on how you can have a custom phone case, without a lot of hassle! To start I purchased this clear plastic case on eBay for about $5.00.


Saturday, September 7, 2013

Easy Envelope Pillow Cover Tutorial!


I decided this weekend that my bed was looking rather plain. Since it's not really in the budget right now to overhaul all my bedding, I decided I could jazz it up some with some fun pillows. But then, I got a little bit of sticker shock. Have you seen the prices on pretty, decorative pillows? It's a little crazy if you ask me.


Wednesday, September 4, 2013

ANOTHER upcycled jewelry box!

What is it with me and vintage jewelry boxes? I just can't stay away! I found this one hiding in the back of the thrift store, begging to be saved. Aside from being badly outdated, it was in really good shape, and it has a lot of storage! Here's the before:


Monday, September 2, 2013

Tutorial: Pajama Pants to Scarf!

I love flannel pajama pants. Today I'm going to show you how to give your pants a second life, and turn them into a trendy circle scarf!


Saturday, August 31, 2013

DIY Hanging Dish Towel- with Pattern!

I made these towels quite a while ago, when I got frustrated at my kitchen hand towels always ending up on the floor! I made these pre-blogging days, so I don't have a tutorial, but I'd like to share where I got the pattern and my end result! Here is the pattern. I just printed it out and it was super easy to follow! You could use Velcro instead of button holes, but I thought the buttons would be sturdier, and I had my mom to help me out so I chose the button route.


I chose some brown striped dish towels I found on clearance at T.J. Maxx, and my fabric came from Joann Fabrics, children's flannel on sale! I think I *maybe* spent $15 total for all four towels!


I typically only hang two at a time, and switch them out as needed to be washed. I LOVE these! If you try it out, please let me know! 


Monday, August 26, 2013

How to: Mason Jar Salads.

So I've really been trying to make an effort to eat better. I do love salads, however it's such a pain trying to keep the lettuce fresh, and having to make up a salad every morning to take to work gets old fast. The first time I saw these mason jar salads on Pinterest, I knew I HAD to try it! Since I first saw this idea, there have been dozens of reincarnations floating around Pinterest. So here is my take!


Wednesday, August 7, 2013

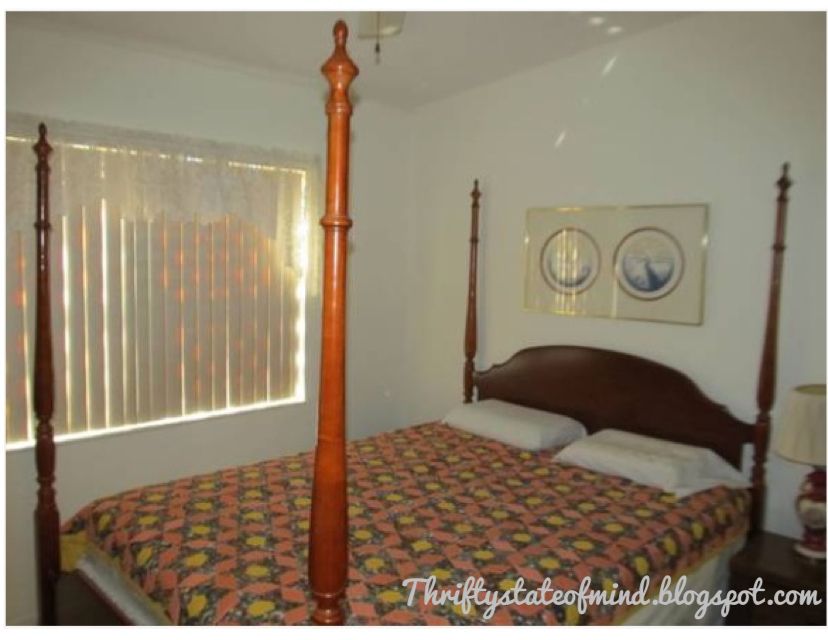
New Bed(and dresser) Reveal!

Last week I left you hanging on my new bed frame, with only a sneak peek. Today is the big reveal! Here's the before:

Orangey-Red Cherry Wood, not my style!

Tuesday, July 23, 2013

"Shabby Chic" Dining Chairs

I bought these chairs off craigslist a couple weeks ago, intending on keeping them for myself. However, as soon as I got them home and set them next to my dining table, I knew they would not work. Just not the right style. So, I decided to fix them up and sell them!

Here's the before:

This is the craigslist photo!


Monday, July 15, 2013

DIY "Everything" Cleaner

Hi guys!


Today I'm going to show you how to make your own multipurpose cleaner, for pennies less. I absolutely love this stuff! I saw this recipe on pinterest, but I can't find the pin now. I have always used vinegar to clean with, but this is like vinegar on steroids! Also, it doesn't have that strong "vinegar" smell. This is a simple combination of cheap ingredients and it really cleans like no other. I've used it on mirrors, the stove, counters, toliets, and I mix up a strong version of it for mopping.

The ingredients are simple: White vinegar, baking soda, and concentrated dish soap. 


Sunday, July 7, 2013

Thrift Store Mirrored Tray Redo

It never ceases to amaze me the things I find in thrift stores that other people have overlooked! I found this awesome mirrored brass tray cast aside on a corner shelf... and it spoke to me!

 
Yes I like garlic sauce with my pizza!


I was so excited to get started, I started taping off the glass without taking a "before" photo!